Astronomy - PhotoPosition with 2 Calibration Points selected
PhotoPosition Help
Unconfirmed Calibration Screen
Application
Principals
PhotoPosition
Equipment
History
Help, P3
<==         Help       ==>
Photo's date/time has been updated
- read from selected file

Progress shows next prompt
Photo already selected (different layout in Chrome)
App has updated X, Y for Clb#1 - see below
User also selected Constellation
User also clicked on appropriate star in graphic
App has indicated the star in drop-down and updated RA/DEC parameters


Graphic shows selected:
  • Constellation
  • Stars, with names
  • Constellation lines
  • Highlighted selected stars (in pink & orange)


App X, Y has also been updated for Clb#2
And, retained the previously selected constellation
Star was selected from the graphic & now shown in the drop-down
RA/DEC for Clb#2 has been updated


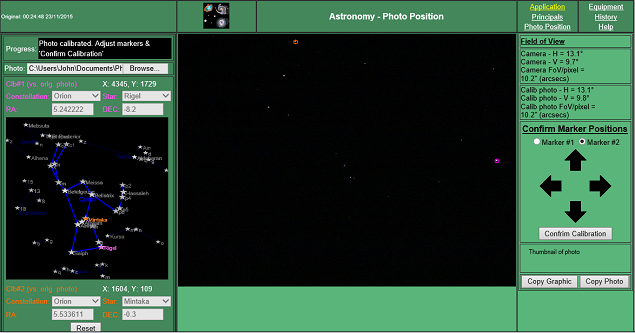
Camera's FoV details - see previous help screen

Photo's FoV details determined from:
  • The (photo's) X,Y co-ordinates of the calibration points
  • RA, DEC co-ordinates of the selected stars from its' database
The drawing shows the calibration points have been adjusted - see below.


Once the calibration points are correctly positioned & the FoV details are aligned, then the photo can be completed by pressing the < Confirm Calibration > button.
    Once the 2nd star has been selected, the App will:
  • Select the star in the drop-down
  • Redraw the star in orange on the graphic
  • Populate the RA/DEC co-ordinates (for Clb#2) from its' database
  • Provide an initial calibration of the photo
    1. The App will then update 'Calib photo' details
To adjust the calibration points:
  1. Select the relevant point, using the radio buttons
  2. Click on the relevant direction buttons (one click is required per pixel - Android cannot handle timers to repeat on holding down)
    • The App will:
    • Move the marker to the correct position
    • Update X, Y photo co-ordinates (original size) in the left pane
    • Recalculate the Calib point FoV parameters and update them
  3. Repeat 1 & 2 until the photo is correctly calibrated (assuming it is possible)